
photos by Cajetan Sorich
I went to Blick last month to buy India Ink for a tattoo. I got there, went up the escalator, and asked a guy to show me where I could find the ink.
“I’m going to give myself a stick n poke,” I told him.
“Oh…I wouldn’t do that. It’s not a good idea to give yourself tattoos.”
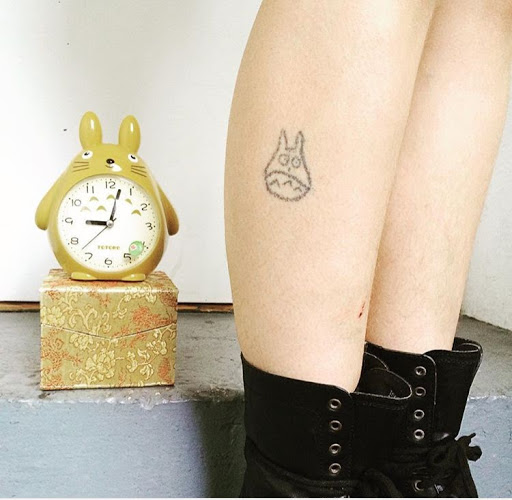
Okay, sure, the man could be right. But, I have seven of them and none of them have been a big deal, emotionally or physically. I did my first at 18, on my leg, after eating a weed cookie. Seven years later, my Totoro is looking great. The lines are still dark and thick, despite punching him in with the teensy tip of a sewing needle.
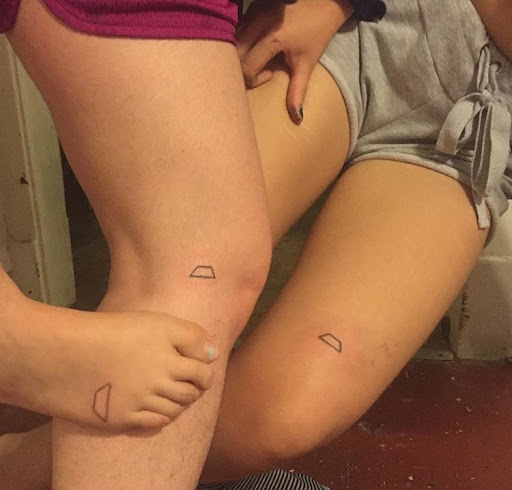
The same weekend, I did dots on my fingers–also with a sewing needle. A couple years later I realized you could buy actual tattoo needles and use them sans a gun. Muuuch easier. Me, my little sister, and my best friend all recently became roommates, and tattooed matching trapezoids on our bodies. Trapezoids because they’re shaped like houses.
Blick guy: I just want to tell you, casually, that those are still looking good. Again, though, I want to quote your advice as a gesture of responsibility to the reader; I don’t know how “good” it is to give yourself tattoos, I just do it, and it’s turned out “good” each time, okay?!
Not great, as in, not perfect. But, part of it is that I’m not a perfectionist and don’t mind messiness or the look of a clearly unprofessional tattoo on my body. My stick n pokes all have some uneven shading or outside-the-line dots, but I’m not sure how much of this can be attributed to the process, and how much to my hasty personality and rough way of doing things. I think that if someone were to practice a little on an orange, carefully outline a design on their skin (or even better, use transfer paper), and take their time, they could definitely create a perfect tattoo with none of the above problems. I did none of that careful stuff, and it shows. But it’s cute.
I’m going to give you my personal guide to stick n poking. I’ll be sure to include all of the most careful steps, but I’ll also let you know which I find optional.
Remember, this is my guide. Meaning all of this works well for me, and the conclusions I’ve drawn about what works if from experimenting on my own body. It may also work for you, but please do your own research before poking.
MATTER
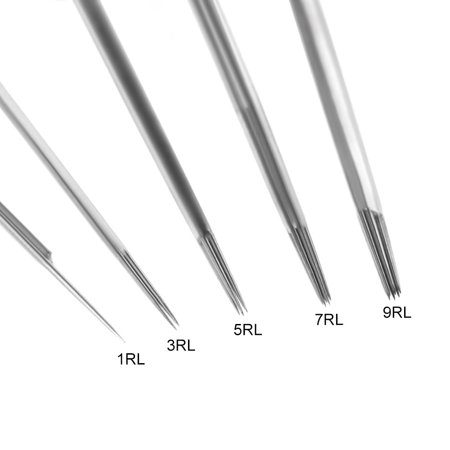
- Tattoo needles. A big pack with various sizes is ideal. Try a pack with sizes 1RL-9RL, 1RL being the tool for the thinnest lines, 9RL for the thickest. A sewing needle could work, in which case you’ll need a pencil and thread or floss.
- Ink. I use India Ink because it’s cheap and google tells me it’ll work. However, authentic tattoo ink is probably best. I’m not going to link a specific tattoo ink because I haven’t actually worked with any, but just google “tattoo ink,” check our different brands, and read reviews.
- Petroleum Jelly (optional). To keep your stencil in place!
- Pen. I use a pen to just draw the design onto my skin before tatting it in.
- Dish Soap. For both prepping your skin and wiping off stubborn ink.
- Rubbing alcohol. That’s what I use to sterilize my skin and the needle.
- BONUS: Bactine. For a skin soothing miracle.
- Paper towels or clean cloths: If you use cloths, be willing to stain one or two with ink.
- Ink cups. Any small, sterile container to pour ink into.
PROCESS
Prepare and gather your matter
Choose where to sit: I like sitting on a towel on the floor for maximum mobility. Though, I suppose it depends on where you’re placing the tattoo.
Surround yourself with your tools: Have a sterile surface to set your needle on. To me, that’s a clean few layers of paper towels upon a Lysol wiped table. Also nearby, you’ll need paper towels or cloths. I keep a cup of warm water in case I’m having trouble wiping away excess ink. Finally, obviously, have your ink cup filled and ready to start dipping your needle into.
Set your studio mood
Music, podcast, TV on. Beverage nearby. Cats barricaded. Cedar incense burning.
Place your art on your skin
- Disinfect your skin. I wash mine with soapy water and top it off with rubbing alcohol.
- Place design. I’ve only ever drawn mine on with pen or sharpie. But, if you can swing it, it may be worth investing in a sterile tattoo stencil pen.
- Optional Petroleum Jelly (and a large note on following your stencil). Glob it over the stencil so it stays put as you wipe away ink. I’ve never actually done this because the extra substance layer stresses me out. It’s okay to skip the jelly if you find it bothersome, but be prepared for your stencil to fade and wipe away as you tattoo. I find this to be manageable, as my design usually lasts for at least the first layer of dots I punch. This means that, by the time I have to wipe away excess ink and my stencil with it, I have already placed a rough version of the tattoo. How “rough” usually depends on the needle size, as many needles are small enough to punch lines much thinner than a pen or sharpie outline.
- Choose your needle. If you want thick lines, use the 9RL. It’s end comprises the most needle points, which will make thicker lines. If you want thick lines but are limited to thin needles, don’t worry. As I said, I have a dark, thick Totoro that I made with a measly sewing needle. However, it took me two days to build the tiny dots into thick lines.
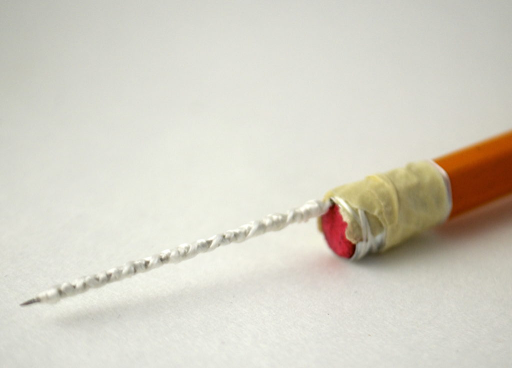
- Think of it like stippling–you’re creating images with dots. The bigger the dot, the quicker it takes to create a line. The smaller, the more control you have over detail. You can, of course, use a combination of sizes. If you choose to use a sewing needle, you should rig it to a pencil using thread or dental floss. (see photo above)
- Start poking your skin! Something I seriously wish I knew when I did my first: hand-poked tattoos are supposed to hurt a lot less than machine tattoos. When getting the hang of stabbing yourself, please remember that if it doesn’t hurt, that’s normal. And great! However, some areas will be more sensitive than others and may hurt a bit. Judge the appropriate depth by two things: a) the pain should be super bearable, b) the dots are showing up as you want them too–though, if the needle is thin, they will still appear faint at first.
- What to expect dot-wise (and sort of a continuation of 3’s stencil note). You may expect your initial ink pokes to produce replicas of the stencil lines they follow, but they may actually be much lighter, more crooked, and more sparse than you expect. For this reason, I actually find it helpful to completely wipe away my stencil to see what I’m really working with. This method is for you if you’re open to a more organic design process, and are okay with improvising a bit as you veer from your initial outline and instead follow the direction of the slightly unpredictable dots. If you want to keep following your stencil, that should work too! Just know that you may be a little more blind to the progress placing your dots and building them into your design.
- Are you done? If your tattoo looks how you want it to look, you’re done. BUT, if it doesn’t, yet you’re exhausted, you can take a break. Long breaks! The beauty of tattooing yourself is that you can take as long as you want. There’s no pressure for perfection right off the bat, because you can touch it up whenever you notice a “flaw.”
- Clean and soothe that beauty. I rinse off all the ink with slightly soapy, warm water. Another wipe of rubbing alcohol is probably good, but I’m not actually sure. I do it, but you should probably Google it. No need to wrap it up, unless you need to put tight clothing over it right away. In that case, a big bandaid or some taped-on paper towel should be okay.
POST OP
Use gentle soap to keep tattoo clean. New stick n pokes usually require less attention than machine tattoos, so you probably only need to do this once a day for a few days, and then just whenever you shower. Likewise, use unscented lotion on it for maybe two days, and then just apply to your tat when it feels dry. Finally, I’m a hypocrite for suggesting it, but use sunscreen on the tattoo area. In fact, you should probably use sunscreen everywhere.


Be First to Comment